It’s becoming common for users to be confused due to Samsung TV auto dimming issues.
The dimming on Samsung TVs can be noticeable significantly when the content changes from dark to light scenes.
Along with dimming, users can also notice the brightness keeps changing on Samsung TVs.
Why does my Samsung TV keep dimming?
There are a few common reasons your Samsung TV may be auto dimming; luckily, most are easy fixes.
Auto-Dimming is a feature on modern Samsung TVs as it can help prevent burn-in on OLEDs. It also utilizes ambient lighting detection to adjust the screen dimming depending on your room’s light.
Samsung TV auto dimming screen fix
Here are the most common solutions:
- You have the Adaptive Picture picture setting selected.
- Your power or energy settings are set to reduce the brightness
- You have a faulty HDMI port
- Bad HDMI Cable
We will take you through some steps to help eliminate the dimming issues.
Step 1: Disabled Adaptive Picture setting
The Adaptive Picture mode is a setting that detects and uses your room brightness level to output a darker or brighter image.
Generally, if the room is dark, it will lower the picture brightness and vice-versa.
Unfortunately, this detection technology used for the Adaptive Picture mode may contrast with how you wish to use the TV.
The Adaptive Picture mode can cause auto-dimming if it detects changes in room brightness or malfunctions.
Disabled Adaptive Picture (Newer Samsung TV Models)
To disable Adaptive Picture on newer Samsung models.
Step 1: Press the HOME button on your remote
Step 2: Choose the SETTINGS option from the menu bar
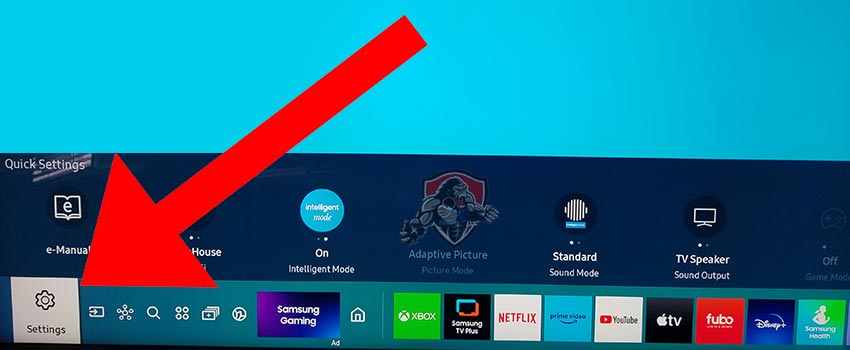
Step 3: Choose GENERAL
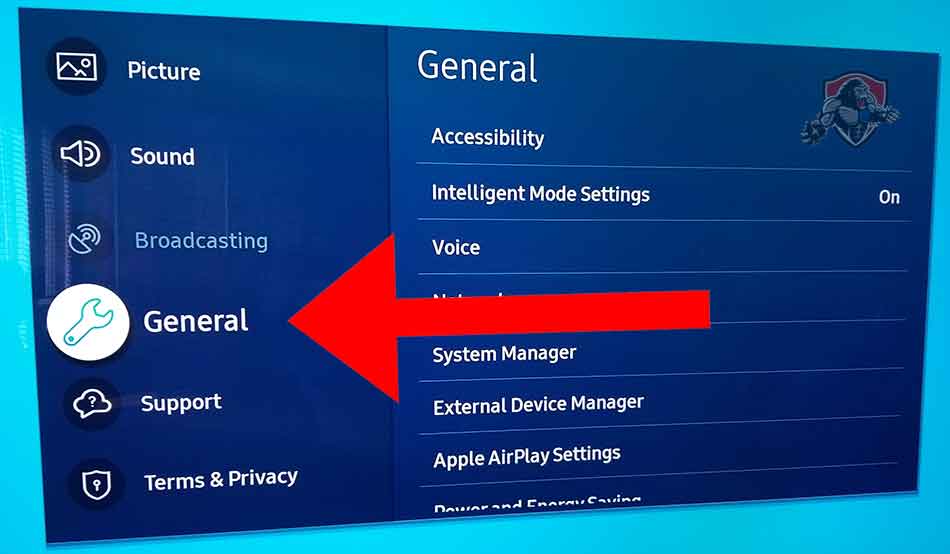
Step 4: Select Intelligent Mode Settings
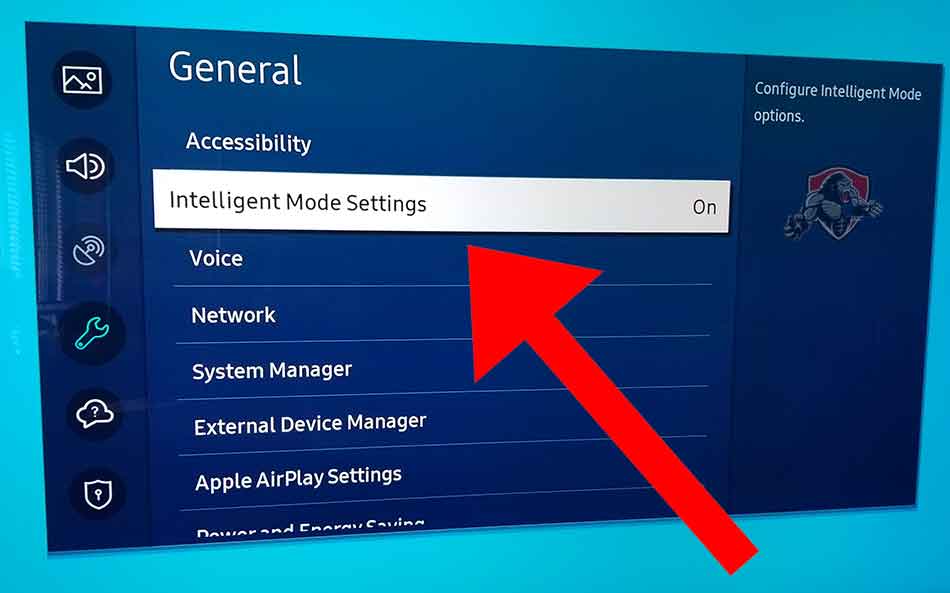
Step 5: Turn off ADAPTIVE PICTURE
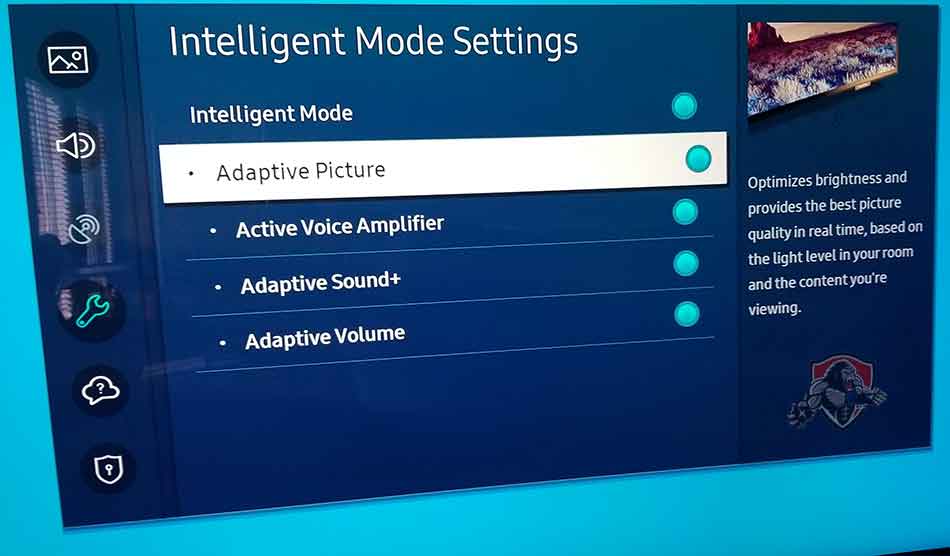
This is the setting that could be likely causing your auto dimming issues on Samsung TV.
As you can see in the description provided by Samsung, this setting optimizes picture brightness in real-time.
This is generally based on the light level in the room where your Samsung TV is situated.
Related Reading: How to fix Samsung TV Blue Tint
Step 2: Review your Power & Energy Saving settings
Like the Adaptive Pictures settings we covered above, the power & energy settings may also cause your Samsung TV auto dimming issues.
You should review these settings.
Step 1: Press the HOME button on your remote
Step 2: Choose the SETTINGS option from the menu bar

Step 3: Choose GENERAL

Step 4: Select POWER & ENERGY SAVING
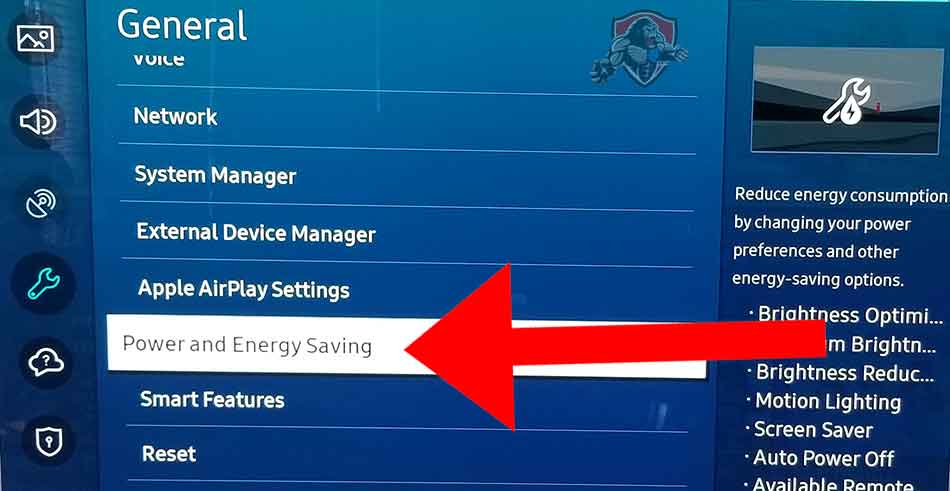
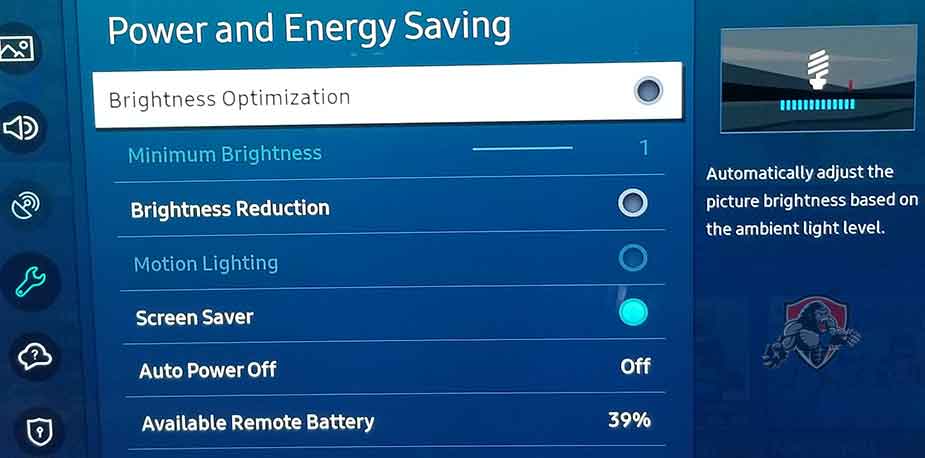
Step 5: Turn off Brightness Optimization and Reduction
These two settings can cause your Samsung TV auto dimming issues.
Step 3: Update your Samsung TV software
It’s a good idea to update your firmware to ensure that software issues aren’t causing intermittent dimming issues.
Updating your Samsung TV firmware can also help resolve other issues, such as a Samsung TV showing a purple-tinted picture.
Keeping the Samsung TV software up to date can assist you in preventing some issues that appear over the lifespan of your TV.
Most Samsung TVs have automatic updates enabled by default, which should install automatically, presuming that your TV is connected to the internet.
Even with this setting enabled, it is possible that updates can be missed or an installation can be interrupted and thus cause issues with your TV.
Older Samsung firmware or a partial software installation could be causing the dimming screen problem.
We strongly recommend updating your Samsung TV firmware to ensure you have the latest software, access to new apps, and an improved viewing experience.
Ultimately, regular updates improve your viewing experience and give you better security & privacy protection.
How to update your Samsung firmware
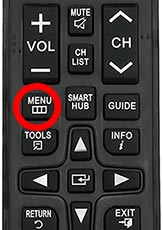
If your TV is turned on, hit the HOME or MENU button on the remote.
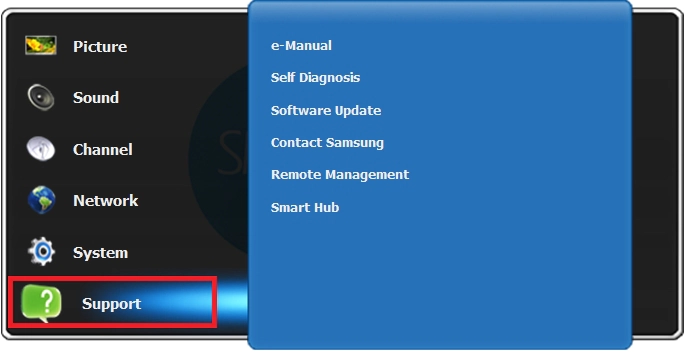
Now you will see the setting menu appear on the left-hand side of the TV (Please note that this may vary depending on the model of your Samsung TV).
You should scroll down to SUPPORT and then select SOFTWARE UPDATE from the menu on the right-hand side.
Once the updates have been installed, check to see if your Samsung TV auto dimming issues persist.
Step 4: Change your selected input device/source
You should confirm whether or not an external device causes the dimming issue.
You can change the input device or source by pressing the corresponding button on the Samsung remote, as shown in the image below.
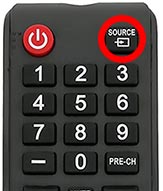
Once you have pressed this button, you are shown a list of available inputs.
Inputs are the devices that are connected to your Samsung TV. This could be a DVD player, Cable Box, Firestick .etc
You should navigate through your inputs to see if the dimming issue persists when you change through the different inputs.
If the dimming issues are present on each port, it would suggest that the problem is coming from your Samsung TV unit.
If you can limit the dimming issue to one external device or port, you should investigate the settings for the device attached.
You may also want to switch that device to another port to rule out an I/O or port malfunction.
What is an input device I/O issue?
I/O stands for input/output – it generally refers to the different ports on your TV like, HDMI, DVI, DisplayPort, USB.etc.
It is not uncommon for a port to become damaged or unusable after prolonged use or an extended period of plugging and unplugging cables into the same port.
I/O Input issue example:
The dimming issue is only present on HDMI 2.
This would suggest you have a damaged HDMI 2 port or a bad HDMI cable.
Step 5: Contact Samsung Support
If none of our tips have helped resolve the Samsung TV dimming issue, it might be time to consider contacting Samsung support, as you may have a defective TV unit.
Samsung may be able to advise you of other things to try or help diagnose the root cause of the issues.
I would strongly recommend contacting Samsung before you consider any other fixes that may invalidate your warranty or cause further damage to your Samsung TV.
Conclusion – Samsung TV Dimming Fix
When you have a Samsung TV that keeps dimming, it is annoying but rarely means that you have a broken TV.
Most Samsung TV dimming fixes can be found in the settings menu.
You will usually resolve the issue with a few tweaks to your TV settings.
We hope these tips helped you!

